Complete step-by-step guide for absolute beginners
Version 1.11.0 · Windows 10/11 (64-bit)
New in 1.11: CPU sustained FFT load and GPU 3D stress with transparent stats overlay; update notifications and “Check for updates” for licensed users; tray reminders during trial; withdrawal consent before PayPal; group pause requires full license; download page with online/offline setup and archive (no public ZIP); SQL admin protected against manipulation (SELECT/INSERT/UPDATE/TRUNCATE allowed, schema commands blocked); updated F1 help and manuals.
1. Introduction – What is SensorPulse?
SensorPulse is a complete hardware monitoring suite for Windows 10 and 11. It reads sensor data from your PC – CPU temperature, GPU load, fan speed, disk usage, network adapters and more – and displays everything in clear tiles, charts and tables.
The main window: live sensors, sparklines and hardware grouping.
What SensorPulse can do
Live dashboard with colored tiles, sparklines, favourites bar at top and hardware grouping
History charts with zoom and detailed reading explanations
Custom alarm thresholds, alert sidebar and alert history
Tools Hub with fan control, GPU info, benchmark, export and more
Built-in Task Manager with process actions and performance charts
Transparent game overlay for CPU/GPU/FPS while gaming
Program launcher for installed apps and games
SQL Admin and automation (full license, protected against manipulation)
Privacy – everything local, no cloud
SensorPulse runs entirely on your PC. There are no user accounts, no cloud sync and no telemetry to external servers. Readings are stored in a local SQLite database (sensordata.db) next to the application – only when you enable it in settings.
Tip: You can optionally connect a local Ollama AI for extended history analysis. Data still stays on your machine – no external AI API is used without your setup.
7-day trial
After the first start you automatically get a free 7-day trial. During this period you can use full monitoring, history, overlay, export, benchmark, per-sensor pause, tools and Task Manager. Premium features (SQL admin, automation, auto fan curves, large-file scanner, group pause) require the full license.
When the trial ends, live monitoring stops. Unlock SensorPulse anytime with a one-time PayPal payment of €4.99 (see chapter 12).
2. Installation
SensorPulse is available in three variants. Choose the right method on the download page.
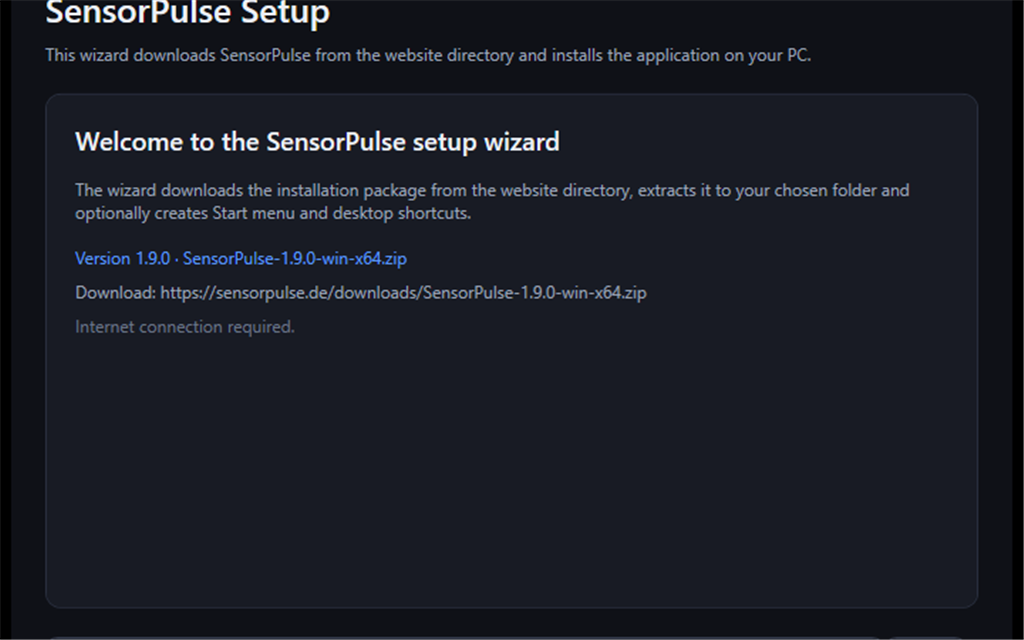
Click “Download online setup”. The file is named SensorPulse.Setup.exe (language matches the website).
Double-click the setup file. Windows may ask for confirmation – click Yes.
The wizard starts and downloads the application package from the internet. Make sure you are online.
Choose the destination folder (default is fine).
Enable or disable desktop shortcut and Start menu entry as you prefer.
Click Install and wait until “Finished” appears.
Launch SensorPulse from the shortcut or Start menu.
Online setup advantage: Small download – the wizard always fetches the current version from sensorpulse.de at start.
Option B: Offline Setup
Download the offline bundle (ZIP) from the download page.
Extract the ZIP to a folder of your choice.
Run the included SensorPulse.Setup.Offline.exe.
Follow the wizard like the online install. No internet is needed – everything is in the package.
Finish installation and start SensorPulse.
The setup wizard (online or offline installation).
System requirements
Windows 10 or 11, 64-bit
.NET Framework 4.8 (usually pre-installed)
About 50 MB free disk space
WebView2 runtime included in the package (runtimes\ folder)
Note: For full access to all hardware sensors (motherboard, CPU temperature, NVMe), administrator rights are recommended. The app still works without admin – some sensors may be missing.
3. First Launch
On the very first start SensorPulse runs through several steps. This can take 10–30 seconds – please wait until the dashboard appears.
Step by step on first launch
Start SensorPulse.exe with a double-click.
A loading screen appears with progress: database, settings, license, hardware sensors.
After loading you see a short 7-day trial notice (e.g. “Your 7-day evaluation is active – X days remaining”). It disappears automatically.
The main window opens on the Sensors tab with the first sensor tiles.
Monitoring usually starts automatically. Values refresh every few seconds.
Understanding the trial
Trial status is shown in the status bar and under the License button. You can activate anytime – remaining trial days are displayed. After 7 days an overlay appears; monitoring pauses until you enter a license.
Administrator rights
If few or no temperature sensors appear:
Click Settings (gear icon) in the status bar.
Click Run as administrator.
Confirm the Windows UAC prompt with Yes.
SensorPulse restarts with elevated rights. More sensors should now be visible.
PawnIO (optional, for AMD CPU sensors)
Direct CPU temperature reads on some AMD processors need the PawnIO driver. If SensorPulse reports this:
Start SensorPulse as administrator (see above).
The PawnIO installer may run automatically if bundled.
Alternatively download PawnIO from pawnio.eu and install manually.
Restart SensorPulse as administrator afterwards.
Not required for everyone: Many Intel systems and GPUs provide sensors without PawnIO. Install only when SensorPulse asks or CPU temperatures are missing.
4. Main Dashboard
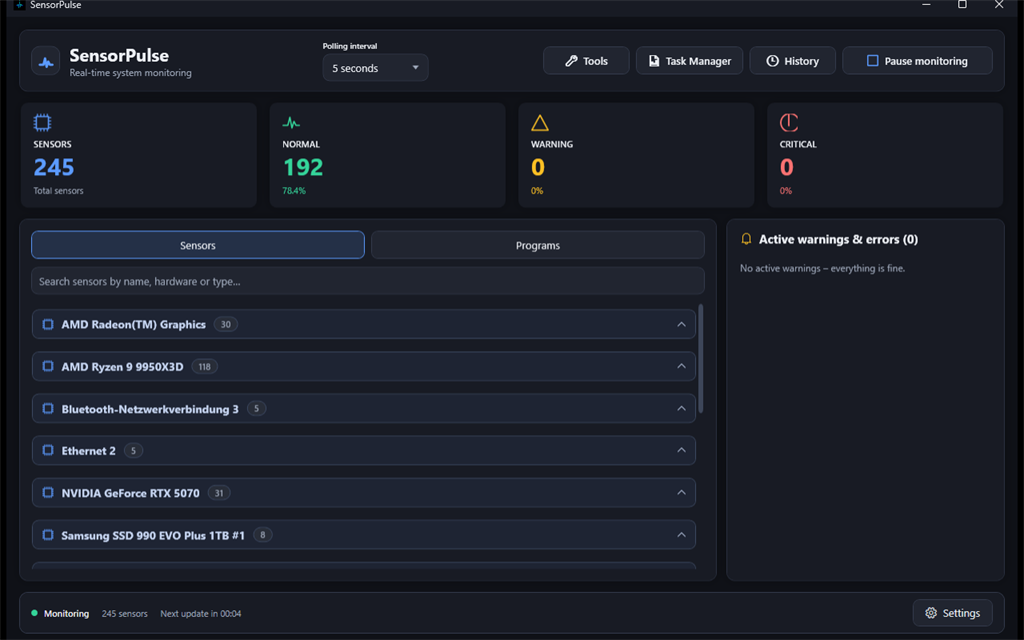
The dashboard is your central screen. Here you see all live sensor values at a glance.
Dashboard: summary cards, search and grouped sensor tiles.
Sensors tab
Make sure the Sensors tab is active (next to Programs).
The sensor list is grouped by hardware: CPU, GPU, motherboard, memory, storage, network, battery, etc.
Groups are stacked vertically; tiles within a group are arranged side by side.
Each group can be expanded or collapsed by clicking the group name.
Summary cards
At the top you see four cards: SENSORS, NORMAL, WARNING, CRITICAL.
Click SENSORS to show all sensors (clear filter).
Click NORMAL to show only green, OK sensors.
Click WARNING to filter yellow sensors only.
Click CRITICAL to show only red sensors.
Click the same card again to clear the filter.
Search
Click the search box “Filter sensors by name, hardware or type…” or press Ctrl+F.
Type a term, e.g. “CPU” or “Temperature”.
Only matching sensors are shown. Press Esc to clear the search.
Favorites
Right-click a sensor tile.
Choose Add to favorites.
The sensor appears in the Favorites group at the top of the list – highlighted and independent of hardware grouping.
To remove: right-click → Remove from favorites.
Groups and sparklines
Groups: Sensors are sorted by hardware. Right-click a group header → Pause/Resume group monitoring (license required).
Sparklines: The small curve under each value shows the last minute of the current session.
Min/Max: Below the current value you see minimum and maximum since monitoring started.
Colors: Green = normal, yellow = warning, red = critical.
Start and stop monitoring
Top right: Start monitoring or Pause monitoring.
Click to toggle live updates on or off.
Shortcut: Ctrl+P.
When paused, values freeze; the status bar shows “Paused”.
Other header buttons
History – Opens charts (Ctrl+H)
Tools – Opens the Tools Hub
Task Manager – Opens the built-in Task Manager
Refresh interval – How often values are read (0.5 s to 1 minute)
Sensor tiles – double-click and context menu
Double-click a tile to open History for that sensor.
Right-click for: open history, favorite, per-sensor pause (trial), group pause (license).
5. Settings
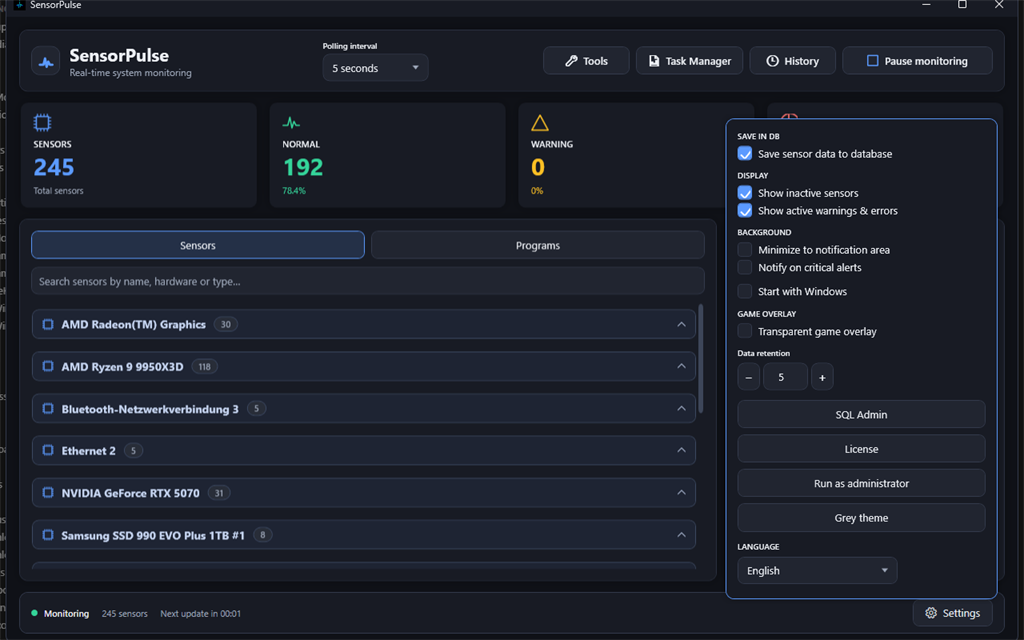
All important options are under the Settings button in the bottom status bar.
Settings: language, theme, DB storage, overlay and more.
Open and close settings
Click Settings (gear) bottom left to open the popup.
Click Settings again to close it (toggle).
Alternatively: Esc or click outside the popup.
Changes apply immediately and are saved to the local database.
SAVE TO DB
Persist readings to sensordata.db – Enable to write measurements to the database. Off = live display only, no history storage.
Data retention – Numeric field (1–3650 days) with − / + or direct input. Saved when you close settings and on exit. Only active when DB storage is enabled.
DISPLAY
Show inactive sensors – Also shows sensors that only report zero (e.g. disconnected network adapters).
Show active alerts and errors – Toggles the alert sidebar on the right.
BACKGROUND
Minimize to notification area – Keeps running in the tray; tooltip shows CPU/GPU temperature when available.
Slower refresh in background – Less frequent sensor polling when minimized – saves CPU on weaker PCs.
Notify on critical alerts – Tray balloon when the window is hidden and a critical alert occurs.
GAME OVERLAY
Enable Transparent game overlay to show CPU/GPU load, temperatures and FPS over all windows.
The overlay is click-through and sits at the top right of the screen.
Theme, language and admin restart
Dark theme / Grey theme – Switches between dark and light UI.
Deutsch / English / Italiano – Changes the entire UI language immediately.
Run as administrator – Restarts the app with elevated rights (UAC prompt).
Check for updates – Full license only: manually checks whether a newer version is available on sensorpulse.de. Licensed users also receive automatic notifications at startup.
License – Opens license activation.
SQL Admin – Available only with an active license. Protected against manipulation.
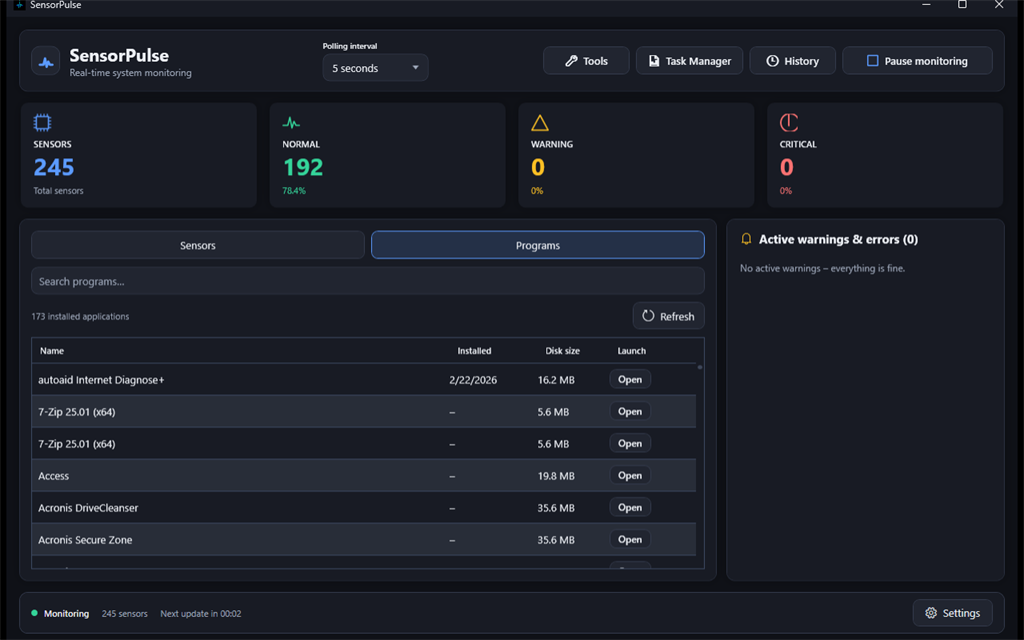
6. Programs Tab – Launcher for Apps and Games
Next to the Sensors tab you find Programs. It lists installed applications from the Windows Start menu.
Program launcher with installed apps and games.
Load and view programs
Click the Programs tab at the top.
On first visit SensorPulse reads the Start menu (short load time).
Programs appear grouped by Start menu folders (e.g. Games, Office, Tools).
Columns: category, name, install date, disk size, type, launch button.
Launch a program
Find the program in the list (use search if needed).
Click the Launch button in the row or double-click the tile.
The app starts via its shortcut (.lnk).
Games and overlay auto-enable
Programs in the “Games”, “Giochi” or “Spiele” folder are marked as Game.
When you start a game, SensorPulse automatically enables the game overlay if it was off.
The overlay shows CPU/GPU load, temperatures and FPS over the game.
Search and refresh
Use the search box to filter the list.
Click Refresh after installing new software.
Limitation: Only Start menu shortcuts are listed – not Microsoft Store apps without a Start menu shortcut.
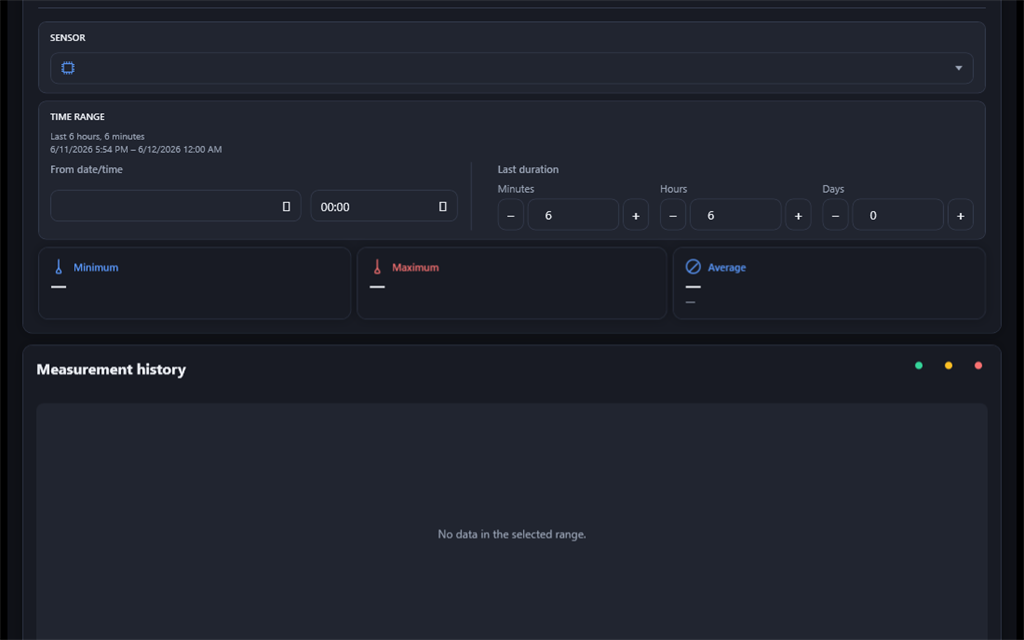
7. History Window
History shows stored measurements as a chart – provided “Save to DB” is enabled.
History chart with threshold zones and statistics.
Open history
Click History in the main window or press Ctrl+H.
Or: double-click a sensor tile or “Open in history” from an alert.
Choose sensor and time range
Select a sensor with stored data from the dropdown.
Pick a time range: e.g. last 15 minutes, 1 hour, 24 hours or custom.
Click Refresh to reload chart data.
Read the chart and zoom
The curve shows the measurement history. Colored bands mark normal, warning and critical zones.
Below the chart: Minimum, Maximum and Average for the visible range.
Zoom: mouse wheel over the chart or drag to magnify a region (depending on view).
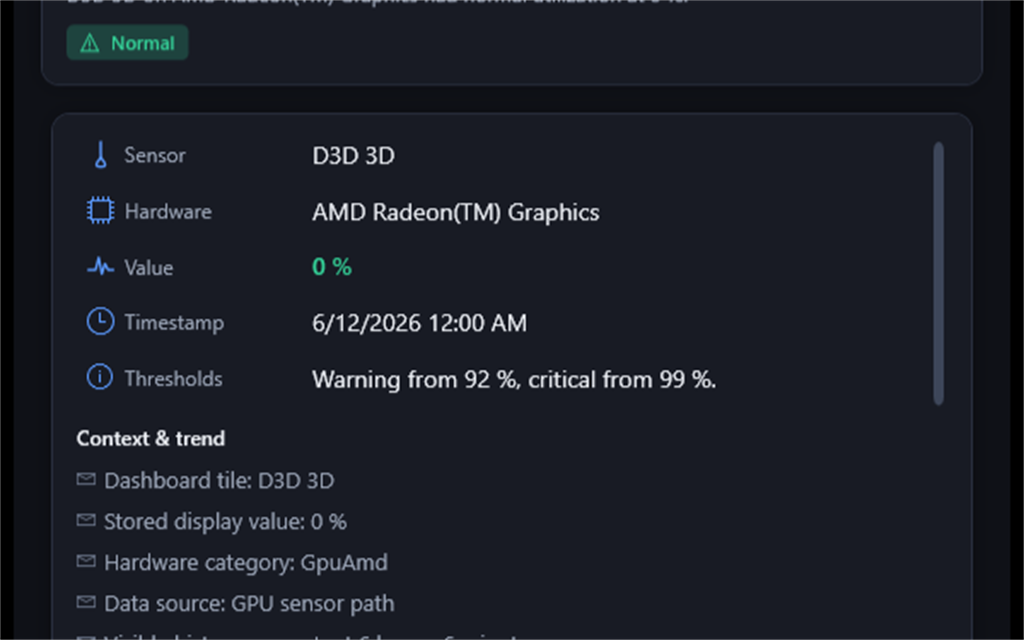
Reading details (double-click)
Double-click a point on the chart.
A detail window opens with explanation, assessment, recommended actions and thresholds.
Section Context & Trend shows comparison values and trend (rising/falling/stable).
Reading details with assessment and recommendations.
Ollama AI (optional)
When Ollama runs locally (default: http://127.0.0.1:11434), an AI analysis section appears.
Enable Ollama in Tools → Autostart & AI (see chapter 9.12).
Without Ollama, built-in rule-based recommendations apply – the app works fully without AI.
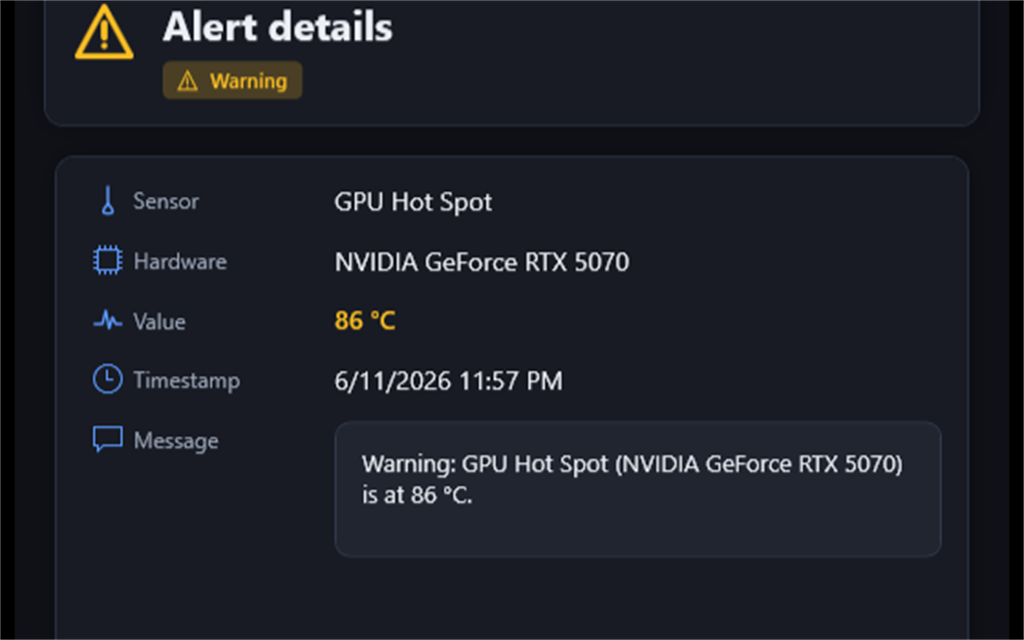
8. Alerts & Warnings
SensorPulse monitors your thresholds and shows active warnings in the sidebar and detail windows.
Alert detail window with recommendations.
Alert sidebar
On the right of the main window you see “Active alerts & errors” when enabled in settings.
Each entry shows sensor name, value and severity (warning or critical).
Click an entry to open the detail window.
When there are no alerts: “No active alerts – all clear.”
Detail window
The detail window shows:
Sensor, hardware, measured value, unit, severity
Timestamp, first seen, occurrence count
Technical identifier and message text
Open in history – jumps to the chart for this sensor
Adjust thresholds in Tools
Open Tools in the main window.
Go to the Alarm thresholds tab.
Adjust warning and critical values per sensor type (temperature, load, fan, etc.).
Click Save thresholds.
Debouncing: Repeated alerts for the same sensor are suppressed for a few minutes so the list does not flood.
9. Tools Hub – Overview
The Tools Hub bundles 12 specialized tabs in one window. Open it via the Tools button in the main window.
The following sub-chapters explain each tab in detail.
The Tools Hub with benchmark, export, fan control and more.
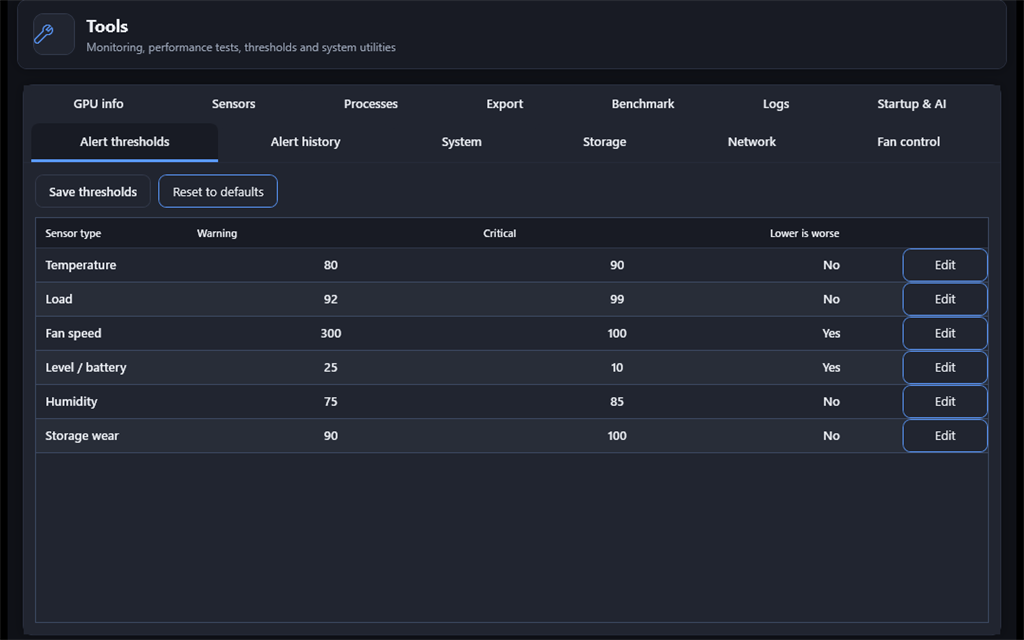
9.1 Alarm Thresholds
Open Tools → Alarm thresholds tab.
The table lists sensor types: temperature, load, fan speed, level/battery, humidity, storage wear.
Double-click a row or click Edit to adjust warning and critical values.
Lower is worse applies e.g. to fans (too low = bad) or battery level.
Click Save thresholds to apply.
Restore defaults resets all values to factory settings.
9.2 Alert History (7 / 30 / 90 days)
Go to the Alert history tab.
Choose the period: 7 days, 30 days or 90 days.
The table shows time, severity, sensor, value and message for all logged alerts.
Use this to spot recurring issues (e.g. regularly high CPU temperature).
9.3 System Overview
Open the System tab.
Read the table with OS, version, architecture, last boot, processor, cores, RAM, computer name, user, model, graphics, uptime, power source, power plan and disk health (since 1.10).
Click Refresh to update values.
9.4 Storage – Drives & Top-100 Scan
Drive overview
Open the Storage tab.
See all drives with label, total/free/used space, type and file system.
Scan top 100 largest files
The scan works on the selected drive regardless of file system – e.g. NTFS, exFAT, FAT32, ReFS or other Windows-supported formats. SensorPulse automatically picks the fastest enumeration for the detected format.
Select a drive in the list.
Click Show largest files.
Wait until the scan completes (progress is shown).
Results show size, file name, path and extension of the largest files.
Use Cancel to stop a running scan.
Caution: Delete files only when you are sure they are not needed. The scan only lists – it does not delete automatically.
9.5 Network Adapters & Speed Test
Open the Network tab.
See all adapters with name, status (up/down), type (Ethernet/Wi-Fi), speed, IPv4 address and MAC address.
Select a connected adapter in the table.
Choose the test duration (10–120 seconds) and click Start speed test.
The test runs download first, then upload via the selected adapter. Live charts show download rate, upload rate and received/sent bytes (B/KB/MB).
An internet connection is required. Traffic should appear on the chosen adapter in Windows Task Manager.
9.6 Fan Control
Open the Fan control tab.
Select a controllable fan from the list (not available on all systems).
Drag the slider to the desired speed percentage.
Click Apply to set the speed.
Caution: Software fan control can conflict with BIOS or vendor tools. Too low speeds can cause overheating. Change only if you know what you are doing.
9.7 GPU Info Panel
Open the GPU info tab.
See name, type, driver version, VRAM (total and used), graphics processor and bus/PNP ID.
Multiple GPUs get separate panels.
Without a detected GPU you see “No GPU detected”.
9.8 Sensors Snapshot Table
Open the Sensors tab.
The table lists all current sensor values: hardware, sensor name, type, value, unit and status.
Use this for a quick overview or to compare many values at once.
Click Refresh to update values.
9.9 Process Monitor (Top 15)
Open the Processes tab.
The table shows the 15 processes with highest CPU or memory usage (refreshes every 2 seconds).
Columns: process name, CPU %, memory.
Click Open full Task Manager… for all processes and advanced actions.
9.10 Export – CSV and HTML
Open the Export tab.
Export current sensors (CSV) – Saves all current sensor values as CSV.
Export alert history (CSV) – Exports logged alerts.
Create HTML system report – Generates a readable HTML report with system and sensor overview.
Choose folder and file name in the save dialog.
9.11 Benchmark – performance & stress tests
Open the Benchmark tab.
Choose test type: short CPU performance, CPU sustained load (FFT) (Prime95-like), RAM, disk, GPU compute or GPU 3D stress test (fullscreen OpenGL with transparent stats overlay).
For CPU sustained load: small FFT or large FFT profile. For GPU 3D optionally enable lite mode. The test automatically opens fullscreen stress plus a click-through overlay with FPS, load and peak temperatures.
Set duration (10–300 seconds).
Click Start test. Live chart in Tools, all overlay values and peaks are stored in the history table (profile, peak GPU/CPU, peak GPU load).
Click Stop to cancel early.
Benchmark tab with live chart and additive SensorPulse points.
Note: The benchmark intentionally loads your system. Close important programs first and ensure adequate cooling.
9.12 Autostart & Ollama AI
Windows autostart
Open the Autostart & AI tab.
Enable Start with Windows so SensorPulse opens when you sign in.
Ollama (local AI)
Enable Enable Ollama insights in history details.
Enter the Ollama endpoint (default: http://127.0.0.1:11434).
Enter the Ollama model (e.g. llama3 – depends on your installed model).
Install Ollama separately from ollama.com and pull a model.
Click Save autostart & AI settings.
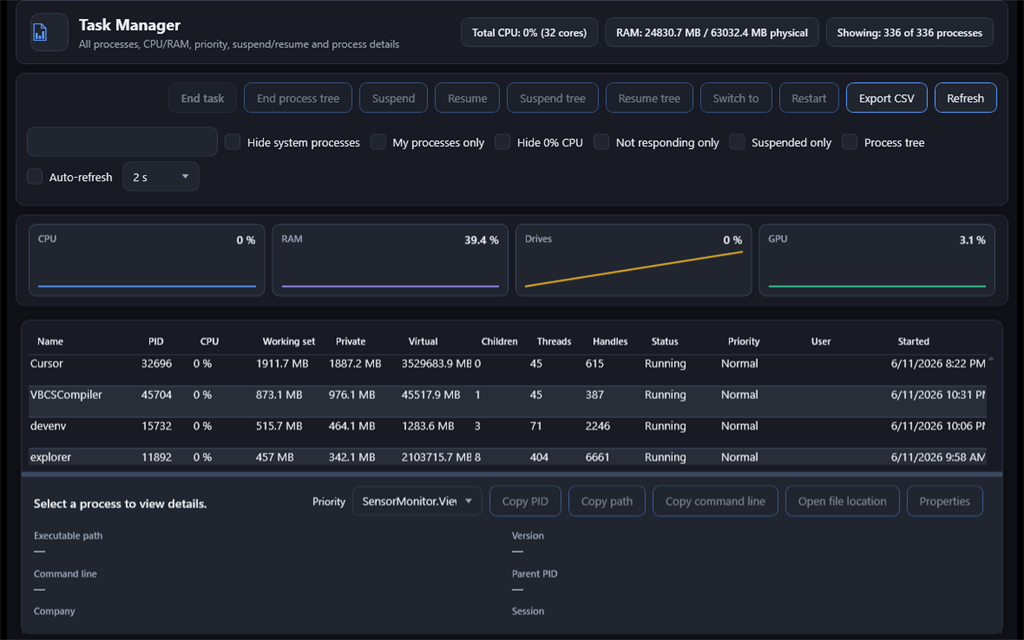
10. Task Manager
The built-in Task Manager shows all running processes with performance charts and extensive actions.
Task Manager: live charts for CPU, RAM, disk and GPU.
Open Task Manager
Click Task Manager in the main window.
The window loads all processes and shows performance sparklines for CPU, RAM, disks and GPU at the top.
Performance charts
Four sparkline cards show current CPU, memory, disk and GPU utilization in percent.
Filter the process list
Use the search box to filter by name, PID, path or user.
Enable filters: Hide system processes, My processes only, Hide 0% CPU, Not responding only, Suspended only.
Summary shows: “Showing: X of Y processes”.
Process actions
Select a process and use the buttons:
End task – Terminates the selected process (with confirmation).
End process tree – Ends the process and all child processes.
Suspend / Resume – Pauses or resumes the process.
Suspend tree / Resume tree – For process and children.
Switch to window – Brings the process main window to the foreground.
Restart – Ends and restarts the process.
Properties – Opens Windows file properties.
Export CSV – Saves the current process list.
Detail panel
At the bottom you see details for the selected process: path, command line, company, description, version, parent PID, session, architecture, total CPU time and responding status.
Change priority
Select a process.
Use the Priority dropdown: Idle, Below normal, Normal, Above normal, High, Realtime.
Caution: Ending or suspending system processes can destabilize Windows. Only end processes you recognize.
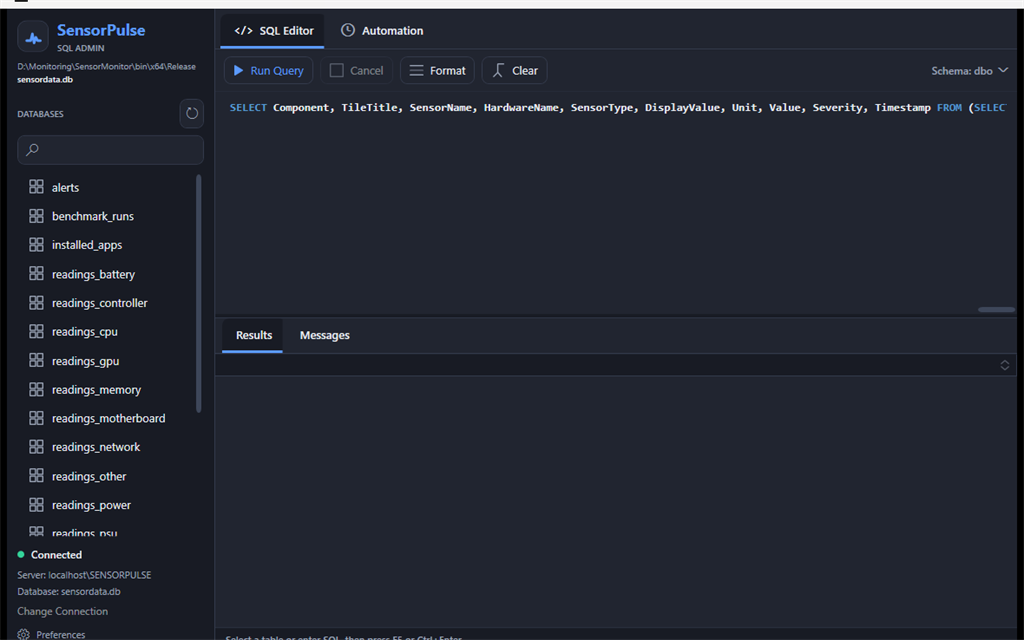
11. SQL Admin & Automation (license required)
SQL Admin is available only with an active full license. It works on the local sensordata.db database. Protected against manipulation.
SQL Admin: queries, tables and automation. Protected against manipulation.
Open SQL Admin
Activate your license first (chapter 12).
Click SQL Admin in settings or the header.
Left: database tables; right: SQL editor.
Tables
Readings are stored in component tables: readings_cpu, readings_gpu, readings_motherboard, readings_memory, readings_storage, readings_network and more. Plus alerts and settings.
Run SQL
Click a table in the sidebar to load a sample SELECT query.
Edit the SQL or write your own query.
Click Run query or press F5 / Ctrl+Enter.
A progress overlay shows the workflow: prepare → execute on database → read results → display in grid.
Results appear in the Results tab; messages in Messages.
Scroll only in the results area – editor and toolbar stay fixed. Large queries without LIMIT are capped at 3,000 rows automatically.